Thursday, October 3, 2013

Repeat Recipe: Low Cal Coconut Salmon

Repeat Recipe: Low Cal Coconut Salmon.. A month or two back I used coconut milk in my cooking for the first time . It was SO dang Dahlicious but it was also really rich, so I decided I'd wait a while before making it again. Finally last night seemed like as good a night as any to embark on the sweet savory journey that is cooking with coconut milk.

I had grabbed the essentials at the grocery store on Sunday but opted for a few adjustments:

1) Light Coconut Milk instead of full fat.... I thought it would help it from being quite as heavy and just figured it would be good to try. Low and behold it was not.
2) Fresh ginger root & green onions instead of cilantro and water chestnuts.. only problem here is that I clearly don't know how you are supposed to keep green onions fresh between Sunday and Wednesday so they were dried up and unusable by the time dinner came around


Even though a few of my changes were not quite ideal, the meal was still great and I would recommend making it if you are looking to infuse some coconut flavor into your salmon, without the calories or heavy soup like broth that the full fat coconut milk provided.

Here's how I did this rendition:

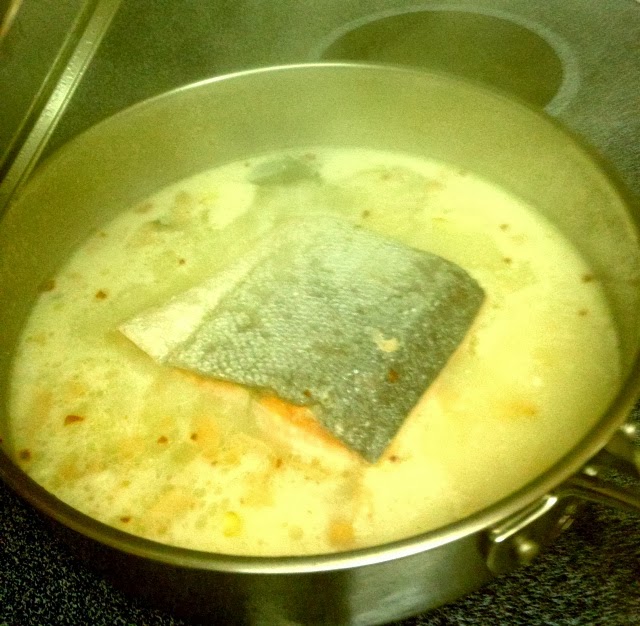
In a large pan I added about half a cup of chicken broth and 2 smashed garlic cloves and brought that to a light simmer. (I used the chicken broth last time to thin it out and so this time using the light coconut milk I probably could have foregone the chicken broth). Once that was nice a bubbly I added the can of light coconut milk along with a slice of lime rind, a bunch of sliced fresh ginger, a sprinkle of red pepper flakes, a couple of drops of sesame oil, a palm full of toasted coconut and a bay leaf.


Once that all came to a light boil I added my salmon (which had been marinating in lemon juice, lime juice, and oil for about an hour). I placed the salmon skin side up in the pan, then covered it with a lid and turned the heat down to low - just a medium simmer. I let the salmon poach for about 12-14 minutes, then I peeled the skin off and served it up!


The broth wasn't really thick enough to be a sauce but a little of it spooned over top was nice for flavor.

I served the salmon with sauteed snap peas and some super yummy confetti rice from TJ's that is full of little nuggets of flavor (ie ginger, lemongrass, baby corn), and a sprinkle of toasted coconut flakes atop the salmon.

All in all in was Dahlish and much lighter and way fewer calories than using the full fat milk. I'm glad I have experimented with both now, so in the future I know which to use when I'm craving a heavier or lighter meal.

PS Here are the ingredients I used:
1 Can light coconut milk
1/2 cup chicken broth
2 garlic cloves
~5-6 slices of fresh ginger
1 lime
1 lemon
1 bay leaf
a few drops of sesame oil
red pepper flakes
fresh wild salmon filet (skin on)

Wednesday, October 2, 2013

Semi Home Made Dinner Ideas

Semi Home Made Dinner Ideas... So far this week I have made two meals that I'll call semi homemade because they both included some vital element that was not made from scratch, well not made from scratch by yours truly that is.

On Monday I made a pretty classic meatloaf meal. I'll say that growing up we did meatloaf occasionally and (no offense mom because usually everything you make is fantastic) it was really not my fav. I'll explain further that in general in life I am not a fan of dry sauce-less food... so for me meatloaf always felt a bit pointless. However, I've had some Dahlicious meatloaf's and the one I am about to tell you about is one of them. I cannot take any credit for it as I merely took the thing from raw to cooked, but I will still take credit for the fact that it was moist and not overcooked.

Meatloaf Monday:
On Sunday I was at the grocery store with my roommate (read: significant other) and we were picking out the proteins for the week.. I had shrimp, salmon, chicken.. but what else. He suggested meatloaf. Done.

The meatloaf at Mariano's (new favorite grocery store - minus the fact that they don't have Justin's nut butter) is perfect for two in terms of size, it comes in a nice little tin baking dish that is so easy to put on a baking sheet and pop in the oven. It is perfectly seasoned and mixed and comes out tasting just like you want it to each time. I love it.

With the meatloaf (which takes 35-45 minutes at 350 or 375) I served roasted cauliflower and asparagus. Such an easy meal and totally filling, while still being relatively healthy with zero carbs in the mix.


The second semi home made meal I made was on Tuesday. After heading to the burbs for a home cooked meal on Sunday night, I was sent back to the city with not only a peach and raspberry cobbler for one night this week, but also a big tub of homemade marinara sauce. Full of San Marzanos, garlic, and fennel - Dahlish! I needed to use the sauce and since I was home alone I figured one easy thing to make would be shrimp and pasta. Except I wanted to avoid consuming too many carbs and I happened to have a perfect little spaghetti squash. Except I did want carbs... they were calling my name... so I just said to heck with it and I made a little of both. If no one sees you eating pasta the calories don't count right? Right??

Tuesday Carb Fake Out:
I had a bunch of fresh shrimp that needed to be used up so I first marinated them in lemon juice and olive oil while I got to chopping veggies and prepping the rest of the meal. Once the brussels sprouts were cut in quarters  and the spaghetti squash was halved and de-seeded, and once they were both dressed in oil and salt and pepper they were sent to the oven at 350 for about 35 minutes.

While the veggies roasted I sauteed the shrimp in a hot pan and added a heaping scoop of the leftover marinara sauce once they were pink on each side. While they marinated in the sauce on low heat to finish cooking, I cooked just a teeny tiny bit of whole wheat spaghetti to mix with my squash.

When everything was finished cooking I combined the two spaghetti's into a nice little mound and covered it with my shrimp marinara. I served it up with the crispy roasted brussels and a little side of prosciutto and fresh mozz. YUM!


Thursday, September 26, 2013

Pork Chops & Figs

Pork Chops & Figs... As a 20 something myself I understand that it's a funny in between time in life. Some of us have 9-5 jobs, others have round the clock jobs, and some have random gigs here and there throughout the day and week. Some of us have significant others, some have kids, some have just their own mouth to feed 3 times a day. Whatever your situation is, I really urge you to start thinking about food as more than an obligation or a treat. Food should be an enjoyable thing; look - we have to eat every day for the rest of our lives so you might as well come to love it. That being said, one has to be careful not to overindulge on a regular basis and learn when a treat is deserved or not. A random Tuesday night is not generally deserving of an ice cream sundae... ya dig?

Anyways, my point with all of this is that learning how to create and enjoy a well rounded meal is going to make life a lot easier, and more delightful (for you and whoever you have the pleasure of cooking for one day). It does take some planning as I have mentioned before, but that's part of the whole growing up thing right? Taking time to be a bit more thoughtful about your health and your day. For me growing up in a house where we ate a lot of home cooked meals around one table together was invaluable and I hope to be able to re-create that for my future family one day, and it really starts with getting into the habit now. It isn't hard to make a healthful yet Dahlicious meal and as I've mentioned before on the blog, my goal is to share the things I make for breakfast, lunch and dinner to hopefully inspire you all to do the same. I think last night's meal was a good example of this and so I wanted to remind myself, and you wonderful followers, what this whole Dahlicious blog is all about. Healthful, Yummy, Accessible food - Enjoy!

The Meal:
Grilled boneless pork chops with roasted butternut squash, steamed green beans, roasted fig & fresh mozzarella salad

The Pork:
On Sunday I got 2 nice plumpy little pork chops from the butcher that I planned to grill all week and pushed off until Wednesday as other meal ideas seemed to clamor to the forefront of my mind in the earlier part of the week. For these bad boys I simply seasoned them with grill seasoning and then seared both sides for about 3 minutes on high heat. They were each about 1.5 - 2 inches thick so I knew this wouldn't cook them all the way through but I wanted the crusty outside you get from the high heat. Once both sides were good to go, I popped them in the oven (which was already at 375 with the butternut squash inside) and let them finish cooking for about 15 minutes.


The Squash:
First of all let me say I can't believe it's already fall and time to break out the hearty squashes again. I feel like roasting butternuts and acorns last fall was just a week ago - crazy! Anyways, butternut squashes are tricky because the skin takes a bit of work to cut off and being that it's so curved you have to be careful. You can often buy it already cubed which is a fine option. I happened to have time on Tuesday night while chopping other veggies to cut it up ahead of time so that it was easy to throw right into the oven Wednesday night. Generally I cut the whole squash into quarters, then carefully use a knife to remove the skin. Scoop out the inside seeds and cut into small similar sized cubes. Drizzle with olive oil, salt, and pepper then into the oven at 375 degrees for about 35 - 45 minutes.

The Green Beans: 
I crave greens and have a hard time ever making a meal that doesn't include some. Last night't were a bit on the boring side but with all of the other sweet flavors in the meal it was nice to have some simple greens. I chopped off the ends and quickly steamed them, making sure they still had a nice little crunch.

The Fig & Mozz:
I am aware this would have been even more greatly enhanced had I had burratta on hand, but a girl can only have so much cheese in her fridge. Anyways, I really love figs but I have never used them in a home made meal myself! Not quite sure what drove the desire to grab them this week but I did, and I sure am glad. Figs can be eaten raw or roasted... or I'm sure other ways I don't even know yet. I chose to roast them, which included cutting them in half long ways, and putting them on the same baking sheet as the butternut squash just in the last 10 minutes of cooking. When I took them out they were soft and creamy and warm, SO DAHLISH! Served with cold fresh mozz and a tiny bit of balsamic it was the perfect addition to the meal.

I love naturally pretty food

I mean these colors are almost a work of art


All in all I think this was a nicely rounded meal - I know it probably looks like a lot for one person, but I made enough for 2 and brought the leftovers to work for lunch... handy right? So if you are a single person out there, no excuses, you too can do it. I promise!


Hope everyone is having an enjoyable week of eating!


Tuesday, September 24, 2013

Prosciutto Wrapped Chicken & Lentils

Prosciutto Wrapped Chicken & Lentils... Last night I put together a really yummy little meal that unfolded very nicely without much planning. At the grocery store this weekend I picked up a couple of chicken breasts from the butcher and also a package of prosciutto. Wasn't planning on necessarily using them together, but both seemed like good things to grab at the time.

The Chicken:
First I tenderized the breasts then I simply wrapped each one in 2 slices of prosciutto. I just made sure they were mostly covered all the way around so the chicken had a nice crispy coating while the inside stayed moist and tender. I pan roasted them on each side at a pretty high temp with plenty of oil for about 3 minutes on each side, or until they were nicely golden brown. Then I transferred the breasts to a baking sheet and popped them in the oven at 375 degrees for 15-18 minutes. This allowed the breasts to cook through fully while maintaining their juiciness.


The Veggies & Lentils:
In a large pan I sauteed 2 sliced little zucchinis with one small yellow onion and a  couple of crushed garlic cloves and  bit of salt and pepper. Once they were nice and caramelized I added my favorite TJ's lentils and gave it a mix.


This was such a simple meal and didn't take much prep yet it felt really well rounded and Dahlicious. The crispy prosciutto added a nice depth of flavor while locking in the moister of the chicken. The zucchini and onion were the perfect addition to the lentils and were super bountiful (I've got a bunch leftover for lunch!). I served it along side a light caprese salad with a little drizzle of olive oil and balsamic glaze. YUM!


Homemade Brat Chili

Homemade Brat Chili... I've mentioned before on here that making a big pot of soup on Sunday for the week is one of my favorite things to do. As Sunday was officially the first day of Fall, I felt that kicking it off with a batch of Chili would be proper. I  went about this one without any specific recipe, just knowing what I like in Chili. I like it chunky, I like lots of tomatoes, and I like it hearty. While at the grocery store I picked up the following items:

1lb ground chuck
4 beer brats
2 14oz cans of diced tomatoes (one plain and one with peppers)
1 medium yellow onion
1 packet of chili seasoning
1 can of kidney beans
1 can of cannelloni beans
1 can of sweet corn
1 small can of tomato paste


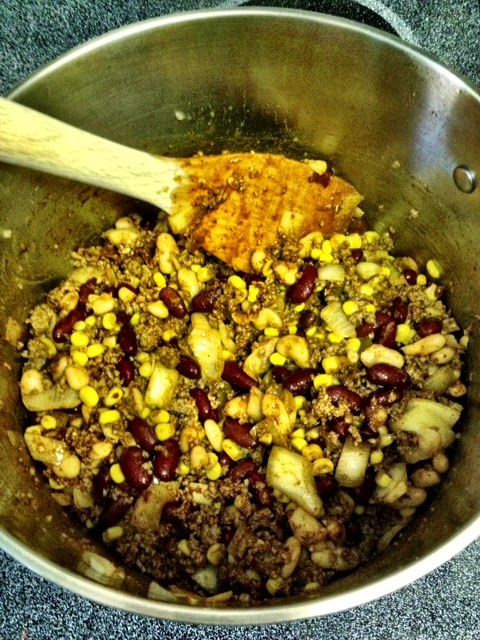
My first step was browning the ground chuck with diced onion and a couple of crushed garlic cloves. While that was cooking I poured the beans and corn into a strainer and rinsed them thoroughly. Once the meat was evenly browned I added the corn & beans and the packet of seasoning. I gave everything I good mix to make sure the seasoning was evenly coating the contents of my chili. To this I added the two cans of tomatoes and a large scoop of the tomato paste. I also filled one of the empty 14 oz tomato cans halfway with water and added that to the pot. I tossed in a couple of bay leaves as well as some salt and a few dashes of Worcestershire sauce. I brought it to a light boil then let it simmer for a couple hours on the stove.


While simmering I roasted a few brats. I'm not sure what inspired this idea but suddenly it seemed like something I wanted to try. I could have grilled them but it was easier at the time to pop them in the oven and let them roast on a baking sheet at 375 degrees for about 25 minutes. Once they were fully cooked but still moist I chopped them up and added them to the chili. I let it continue to simmer and marinate in all the flavors.

When I was finally ready to scarf down a bowl I couldn't help but get back in touch with my semi Texan roots (not really a Texan but did live there for 5 years) by turning it into a variation of Frito Pie. I filled my bowl with chili, topped it with freshly grated cheddar cheese and a big pile of salty crunchy Frito's. I finished it off the a little dollop of sour cream on the side. I mean, Sunday night perfection in a bowl.


Anywho, it was so easy and really Dahlicious. I will definitely be making this again throughout the fall and winter. Enjoy!


Friday, September 6, 2013

Jazzing Up A Stir Fry - Almond Butter & Coconut Oil

Jazzing Up A Stir Fry - Almond Butter & Coconut Oil... Stir fry's are an easy once a week go to, throwing all your forgotten veggies and proteins from the week into a hot pan, with some concoction of liquids for a sauce served over brown rice. It's my favorite end of the week meal. But sometimes I get a little tired of the routine and decide to spice it up. Usually fresh herbs are a great way to do that - green onion or mint. But this week I used a couple of other ingredients in my pantry.. coconut oil and almond butter.

During my travels to SE Asia, visiting all things coconut, I happened to receive a nice little bottle of virgin coconut oil as well as a packet of yummy little roasted coconut bits. I have never cooked with coconut oil before (side note my most favorite meal of the trip included homemade spring rolls FRIED in coconut oil served with a tangy garlic and white vinegar sauce; to.die.for) anyways, I decided this would be a good opportunity to crack open the bottle. Unfortunately on the plane ride home the stuff seemed to solidify into a solid rather than a liquid but I think that's OK because I have seen it sold in the grocery store that way - or at least that's what I told myself to justify using this new ingredient.


Anywho, here is how I jazzed up my Thursday night stir fry...

Per usual is was the same crowd that showed up to the pan, onion, bell pepper, and broccolini... but instead of just sauteing in grape seed oil I did about half and half with that and the coconut oil, it immediately permeated a scrumptious smell. Once the veggies were getting nice and golden brown I pushed them to the side and added in my chopped up chicken, again adding a little coconut oil and grape seed oil. I let those bad boys get nice and bronzed on each side then gave the whole thing a toss with just a couple little splashes of light teriyaki sauce - mainly to deglaze the pan a bit.


Off to the side I made a simple sauce... About 3 tablespoons of some favorite stir fry sauce, a few liberal dashes of soy sauce, and a big spoonful of almond butter. I obviously got the idea from a Pad Thai type peanut sauce, but since my home is an almond butter home, I swapped the two. I let that come to a nice little bubble until the ingredients were all mixed and the almond butter was nice and smooth. Then I simply added the sauce to the veggies, gave them a toss and let them soak up that Dahlicious goodness.


Served over brown rice it was super easy and pretty healthful not to mention Dahlish with the hints of almond and coconut. It wasn't overbearing which was good, but there are other flavors that might be fun to play with in it next time - ie fresh herbs or even sriracha or jalapenos.


Hope this inspires you to jazz up your next stir fry - happy Friday!

Wednesday, September 4, 2013

Oven Roasted Halibut with Spaghetti Squash

Oven Roasted Halibut with Spaghetti Squash... After a whirlwind eating extravaganza for the last two weeks I have decided to cook nice and light this week at home before taking off on another trip this weekend. I spent the past two weeks in South East Asia for work, gorging on dumplings and noodles and every morsel I could fit in my mouth. It was enjoyable but it's nice to be back to home cooked meals for a little while. Last night I wanted to make fish but was really feeling tired of tuna and salmon. I've been in a rut with those two fishes and decided to get myself out. At the store this weekend the Halibut happened to look great so I grabbed that along with a ton of veggies. I decided that I'd roast the halibut in the oven and then finish it with a little lemon/caper sauce atop spaghetti squash and some asparagus on the side.

The Halibut:
Super simple, in a foil pack with olive oil, lemon, salt and pepper. I also put a couple of slices of lemon under the filet to add extra flavor. I put it in the oven at 350 for about 30 minutes which was not enough so I cranked it up to 425 for another 15-20 minutes. It was a thick piece, about an inch and a half or more so it took a while but it came out perfectly flaky and moist. In fact I had a hard time getting a picture because it was so flaky it wouldn't stay in a nice piece... you'll get the idea though.


The Sauce:
In the last few minutes that the Halibut was cooking I simply sauteed a couple cloves of garlic and a big spoonful of capers in olive oil over medium/high heat. I added a bit of chicken stock and let it reduce, then the same again, think quarter of a cup at a time - I eyeball it. Then I added a bit of lemon juice and black pepper and a tiny slab of butter for a little richness. Fresh herbs would have been a good addition if I had had any.. parsley perhaps.


The Veggies:
The spaghetti squash I did as I always do, roasted face down with the skin up on a baking sheet at 350 for 30 minutes. Super easy then just fork out the insides.
The asparagus I also did in a foil packet, pretty much along side the halibut but took it out about 10 minutes before the halibut was ready. Little olive oil, salt and pepper and they steam up nicely without any mess in the foil.


It was an easy dinner and so Dahlish. Super light but also really flavorful. It was nice to get back to non fried food and a lack of carbs, although I can't say I didn't enjoy my gluttonous trip!

I'll definitely be trying more halibut recipe's!