Wednesday, June 27, 2012

30 Min Tuesday Dinner: Pulled BBQ Chicken

Pulled BBQ Chicken... It's Tuesday, I'm a little tired, but I planned to cook at home and thus I decide to make something with a few simple ingredients on hand.
Chicken Breasts
Sweet Potatoes
Haricot Vert (string beans essentially)
BBQ Sauce


...SIMPLE!


On the Menu:
Pulled BBQ Chicken with sauteed haricot vert and baked sweet potatoes


The Chicken:
As I've mentioned before I've really started to master the whole roasting chicken thing (which is good because I somewhat despise grilled chicken - too boring for moi!), so tonight the roasting continues. Normally when I roast chicken it involves legs, thighs, or breasts still on the bone, skin and all. I generally like dark meat best, but I had boneless skinless chicken breasts on hand so I decided to roast them in a bit of olive oil and grill seasoning. I would suggest doing this on 375/400 for approximately 20 minutes ( I was using two large breasts). After the 20 minutes was up they were juicy and tender, perfect for pulling! Using a knife and fork I broke the larger breasts down into shredded chunks. Then in a large sauce pan I poured a liberal douse of TJ's BBQ sauce and let it heat up for a minute or two over medium heat. I threw in the chicken, give it a good mix and let it sit on low heat until ready to serve. ( 30 minutes in total.. 20 to roast, 3 or 4 to pull/shred, 6-7 to mix with the heating sauce).

Pre Roasting

Pulling/Shredding the roasted Chicken

TJ's - Actually quite Dahlish!
Toss & Simmer
The Sides:


  1. Greens: Saute some greens, I had haricot vert, in a bit of olive oil and then add a splash of water and cover with a lid to let them steam at the very end. Done in 5 minutes. 
  2. Sweet Potatoes: The sweet potatoes should be treated just like a regular potato. Give them a rinse, add a few slices or pokes in the skin, and (as an optional addition) cut off the two nubby ends. You can use a combination of microwave and oven to "bake: your potato, or just microwave if you're short on time. I usually just throw them in there on a paper towel and press the pre set potato cooking option.. not sure how many minutes but maybe 6-8 would do the trick?


Tuesday Night BBQ, without the BBQ!
Anyways, this was a super simple meal out of very few ingredients that I had on hand. Not to mention it was satisfying, Dahlicious and balanced as well! Lasttly, sometimes you are craving that BBQ taste, but you don't have the time or energy or resources to actually grill out - so here's your solution!


Enjoy!

Monday, June 25, 2012

Wasabi Asian Shrimp

Wasabi Asian Shrimp... Well sometimes once I start eating one type of food I end up craving it more - have you ever had that happen?? For instance you go to Mexico on vaca and you come home wanting chips & guac and tortilla soup for days after ward. Or in this case, you have Pho on Thursday, you plan another Pho date with your friend on the following Wednesday, and because those asian flavors are persistent in the forefront of your mind (and taste buds) you cant help but creating an asian inspired dinner on Monday.


On the Menu:
Wasabi Asian shrimp with snap peas and pot stickers.


The Shrimp & Peas:
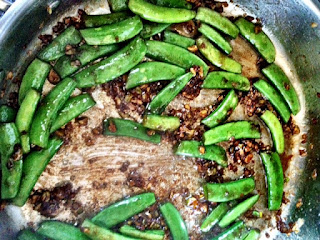
For the shrimp dish I just sort of used things around my pantry/fridge, including garlic, soy sauce, a dash of soyaki, and crushed wasabi sweet peas. In a large sauce pan I sauteed the snap peas with oil and garlic until lightly cooked. Add a big splash of soy sauce and let the greens soften a little more. While the veggies cook pour a bunch of the wasabi dipped dried sweet peas in a plastic ziplock and give them a good crush (I used a meat tenderizer but you can use anything with force, perhaps the bottom of a pot?). Once crushed to a chunky dust, add the wasabi peas to the snap peas sauteeing. Let it all meld together. Next place your shrimp in the mixture, give them some space to touch the bottom of the pan and get a little sear. On medium/high heat the shrimp will cook in just a couple minutes, so be sure to watch them and give them a flip once you see the first side turning pink. Once the shrimp are flipped let them cook on the raw side and then add a touch more soy sauce and a bit of the soyaki (or any other stir fry sauce you have on hand). Turn the heat down to low and let the flavors simmer and meld together until you are ready to serve.

Wasabi Peas
Crushed wasabi peas
Adding the wasabi peas to the snap peas
Giving it a good stir
Adding the shrimp

Flipping the shrimp and letting them simmer


The potstickers:
I am a sucker for dumplings of all kinds, and potstickers are no doubt in that group. As a kid we always celebrated Chinese New Years in grade school by making potstickers and other asian treats so I knew that if I just looked up some recipe ideas I'd be able to make them on my own, however I really did not feel that creative so I opted for Trader Joe's frozen chicken gyoza dumplings. The package said to just brown the little pockets of Dahliciousnes in hot oil for a few minutes, then add a little water and a lid and let them steam for a few more minutes. Unfortunately my potstickers were a little tricky and low and behold, they stuck to the pot!! HA! But really, they were a little sticky so be careful, I would potentially suggest actually steaming them and then sautéing them (I'll try that next time and let you know how they turn out). They ended up being great, despite missing a tiny bit of their wrapper (not to mention 7 of these bad boys are just 200 calories, not bad!).

Browning in the oil

Voila!

Wasabi Shrimp Close Up
You could easily serve this dish with some brown rice or even some sort of rice noodles to continue the theme. 


Hopefully you all like this suggestion for a way to use shrimp inventively with what you have in your pantry (including snack foods such as wasabi sweet peas!). Come back to check out the rest of the Dahlicious easy dinners I throw together later this week!

Saturday, June 23, 2012

Pho


Pho… Now, unlike cupcakes, this is one trend I am absolutely on board with and can see lasting quite some time. Pho itself of course has been around for a long time, but the number of Pho inspired restaurants that have popped up in cities all around the country has definitely increased in the last few years. Boasting names like 9021Pho, Pho Sure, and Pho is for Lovers (my old favorite spot to get the Dahlicious soup in Dallas), it’s hard to not be enticed by the playful and inviting titles. For those of you who have not had Pho, it is a traditional Vietnamese soup. I have mentioned before that I am a soup enthusiast through and through, but I will say that even from a very young age, Asian noodle soups have been at the absolute top of my list. Growing up my mom would take me occasionally to this food market, the Emeryville Public Market with all types of interesting stands, and despite my love of Indian food and Thai food, I always went to the same vendor serving up piping hot wonton soup in a HUGE bowl full of big thick rice noodles. This is one of those dishes that I haven’t had in years but can picture the taste of, as if I were eating it right now. YUM! But enough about noodle soups in general, let's break down this Pho thing. So Pho is a traditional Vietnamese soup but can come with a few variations. The most typical and classic version of Pho includes incredibly hot flavorful broth full of scallions, rice noodles, little beef meatballs, and thinly sliced raw beef (the raw beef cooks instantly in the steaming broth). On the side, you are usually given a small plate piled high with sprouts, thai basil, and lime wedges (at my place in Dallas they also gave sliced jalapenos which I absolutely adored). When the soup comes I take in a big wiff of the savory aroma then go right for dumping in all of the toppings. I also tend to add a squeeze of Sriracha for a little extra heat.


Since moving from Dallas to Chicago, I have done about 84 million google searches on Pho places in my neighborhood and much to my dismay there seem to be none. Nevertheless I decided that Thursday night would be the night I made the trek a few neighborhoods just North of where I live in search of that special soup. I found a spot that looked fun and cute called Pho & I. The area it is in could be considered Lakeview/Boystown (which by the way I totally fell in love with the neighborhood and will be making many trips back now that I know how easy it is to hop on the Brown/Purple line to get there!). Anyways, I got to the El stop and walked the 6 or so blocks to Pho & I. When I sat down I looked at the menu even though I knew what I was there for, and noticed a little cucumber salad that also sparked my interest. I ended up ordering the cucumeber salad as well as a bowl of the Pho Ga. Pho Ga is Pho, but with cooked pulled chicken instead of beef. I do love both but on a warmer summer eve where soup is already questionable I decided to go with the slightly lighter option.


First the waitress brought me that side plate I mentioned before, piled high with all of the crunchy sprouts, juicy lime wedges, and pungent basil leaves to dump in my Pho.

Sprouts, thai basil, lime

Sriracha, hoisin, etc

Next came the salad. Half-moon serrated slices of cucumbers swimming in a clear, sweet and tangy dressing with shaved carrots and finely sliced red onion. It was a Dahlicious little side salad which I continued to eat along with the Pho for an occasional break from the heat of the soup.

Cucumber salad
Then finally, the Pho. It came out in a bowl twice the size of my head and was piping hot. I immediately mixed in the cold sides and a squeeze of Sriracha and a dash of hoisin. To be perfectly honest the rest is history. I gobbled down every last bite and almost even finished all of the broth. It is truly a flavor you come to crave once you get hooked.

Pho Ga

With the toppings!

Sriracha Broth

Now on a beautiful night with time to wander a new neighborhood, delightfully full of Pho, I just had to stop at a little ice cream shop and try what seemed to be a signature flavor, Merlot & Dark Chocolate Chip, atop a warm waffle cone.

Merlot & Dark Choc Chip Ice Cream
The meal was a major success and I will definitely be heading back to Pho & I for another Dahlicious bowl of one of my favorite soups!

Thursday, June 21, 2012

Perfectly Roasted Chicken at Home

Perfectly Roasted Chicken at Home... I have really perfected my chicken roasting skills in the last few months. It takes some tries to figure out the optimal time and temperature and seasoning, but I think I have found that perfect combination.


On the Menu:
Roasted Chicken breasts and thighs (skin on, bone in), with onions, fennel & brussels sprouts, along with sauteed mushrooms.


The Veggies:
Give a bunch of roastable veggies a rough chop. Leave the pieces chunky, and make sure they are similar sizes for even cooking. Onions, fennel, and brussels sprouts are what I have on hand (carrots, celery, peppers, etc would work as well), so I gave them a chop and placed them in a layer on the bottom of a pyrex baking dish. Also add a few whole peeled cloves of garlic for added flavor.

Onion, fennel, brussels


The Chicken:
Place the chicken atop the veggies in the pyrex dish (I used 2 large breasts and 4 legs). Then drizzle liberal pours of olive oil over the top of the chicken making sure to get the veggies covered as well. Lastly sprinkle a mix of lemon pepper and grill seasoning over top of the chicken. Pop the dish in the oven on 425 degrees for 45 minutes. This is my one main tip, the temperature and the timing has worked perfectly for me and I would really recommend doing it at 425 for 45 minutes blindly even if you've never done it before. Then take the chicken out and let it rest for 5 minutes or so before serving.

Seasoned chicken pre roasting

Roasted Perfection
The Mushrooms:
A bit of a random add but I had them around and was in the mood. Simply give them a chop, or buy them already sliced and sauté them in olive oil until browned. Easy as that.

Sauteed mushrooms
This meal comes out perfectly crispy on the outside (chicken and veggies) but tender and juicy as can be on the inside. The veggies will be swimming in a Dahlicious natural chicken gravy of sorts and I promise you will be delighted at the beautiful crispy salty crust on the skin.

Finished Product


Tuesday, June 19, 2012

Easy Beef Stir Fry

Easy Beef Stir Fry... Tonight I was in the mood for a super simple, one plate meal. Easy on the prep, easy on the clean up. I decided to go with a beef and veggie stir fry, I had planned this meal for one night this week and felt tonight was just the right night for it. I really like "stir frys" and often offer up the name to anything that includes veggies and protein mixed together in some sort of Dahlicious sauce served over brown rice, short pasta, or quinoa. This particular stir fry is asian inspired.

On the Menu:
Beef & Veggie stir fry over Brown Rice

The Stir Fry:

For this particular edition of the dish I cut one yellow bell pepper into a bunch of thin slices, chopped up 2 small heads of brocoli, and used a half a bag of sugar snap peas. I gave them a quick wash and sauteed them over medium/high heat until browned in a bit of olive oil. I then added a pour of Soyaki (a  bottled TJ's sauce). I let the veggies simmer in the sauce on low heat. Next I chopped up a pound of raw steak (when I lived in Dallas and shopped at Central Market I was lucky enough to have found pre marinated, pre sliced asian stir fry beef). Unfortunately there was no great solution or substitute from TJ's so as the guy re-stocking the produce section suggested, I grabbed some already cut up stew meat. I sliced the pieces into small thinner bits and gave it a quick sear in another sauté pan on high heat with olive oil. Once browned on both sides I tossed the beef in with the veggies and added a dash of TJ's General Tsao Stir Fry sauce and a few sprinkles of soy sauce. Then I let them whole mixture soak up the flavors on low heat for a few minutes. 

Stir fry veggies
Soyaki

Chop into bite sized pieces
Let it all simmer
The Brown Rice:

Three minutes before serving I popped a bag of TJ's frozen organic brown rice in the microwave and then gave it a quick fluff before serving. 

A large scoop of hot brown rice, covered in a beefy, vegetabley, tangy conglomeration of asian flavors. Make sure to add an extra drizzle of the sauce over top for added Dahliciousness!

Dinner is served!

Monday, June 18, 2012

Greek Shrimp


Greek Shrimp… Tonight’s dinner draws its inspiration from a show I caught this weekend of Giada traveling in Greece. This particular meal came after a number of others where she chowed down on fresh feta cheese, assorted salty olives, and veggies marinated in an abundance of olive oil. These types of Mediterranean flavors are right up my alley, and although I’ve traveled extensively throughout Europe, Greece is one place I've yet to touch down. After watching her boat ride around Crete where a chef/friend made her a Dahlicious yet simple shrimp dish, I decided I would make a similar meal for Monday night dinner.

On The Menu:
Greek shrimp with garlic, onions, tomatoes, olives and feta, alongside veggie quinoa and roasted greens.

The Shrimp:
As per the show I am going to follow along with what I remember the chef doing, adding my own touches here or there. I’ve gathered the ingredients that I recall him mentioning and have added a few of my own…
-          Some large shrimp
-          1 small red onion
-          A few cloves of garlic
-          White wine
-          Lemon
-          14oz can of crushed or diced tomatoes
-          Olive paste/olive tapenade (if you have whole marinated kalamata olives that would work too just give them a good chop)
-          Feta cheese
-          Pepper and herbs to taste (I’m going to forgo using much, if any, salt in this dish as the olives and feta should provide enough of that on their own)

Use a garlic press on a few cloves of garlic and sauté that over medium heat with a liberal pour of olive oil and the chopped red onion. Usually I give veggies a rough chop and keep the pieces on the larger side because they shrink when cooked, however I am going to suggest giving these red onions a fairly fine dice. Let the onions and garlic sauté for a few minutes, and then add in the shrimp. Let them cook for just a minute or two on each side until they are slightly pink/golden on the edges. Then add a bit of white wine and a squeeze of lemon. This is also when I would add some fresh black pepper and some crushed dried oregano or dried basil. Let the white wine reduce for a minute or two and then add in the can of tomatoes and a big spoonful of the olive paste/tapenade. Give it all a good mix and turn the heat down to a light simmer allowing the ingredients to meld together and absorb into one another. Add some more seasoning for taste, or white wine if you like. Then crumble a handful of feta and mix it in just before serving. You can also just top each portion with sprinkled feta if you prefer as well. The first option will create a creamier sauce but the second will add a nice bright pop of white on the red background of the shrimp in tomatoes.

Sauté the onions and garlic

Add the shrimp and white wine

TJ's green olive tapenade

Add the tomatoes and let it simmer away!


The Veggies:

Roasted Brussels:
Cut a bunch of brussels sprouts in halves and quarters, place them in a pyrex baking dish with olive oil, salt, and pepper. Pop them in the oven at 400 degrees for 30-40 minutes. They'll be tender on the inside and crispy on the outside - Dahlish!

Roasted Brussels


Asparagus Quinoa:
Sauté some chopped asparagus in olive oil and add pre made TJ's quinoa (once heated through) to the asparagus. Give a quick toss over low heat.

Sauteed asparagus & quinoa

The Greek inspiration for my meal turned out great and I am happy to share this colorful, easy, and fun dinner with you all! It was super simple and only took as long as the brussels took to roast (roughly 35 minutes). Now who wouldn't love to enjoy a Dahlicious, balanced, satisfying meal like this!!


Thursday, June 14, 2012

Ground Turkey Bolognese

Ground Turkey Bolognese.... This is going to be a slightly "healthier" version of one of my favorite comfort foods. Growing up my mom made bolognese often, and always used ground beef. This version is going to take most of her techniques but will incorporate lean ground turkey as a lower calorie, lower fat substitute. I've never done this before, but am excited to experiment with you!


My family & sauces:
Although my mom generally made the bolognese, my dad is the sauce maker in the family. He loves taking time and using Dahlicious fresh ingredients to create sauces with really deep flavors. For example, after discovering the greatest pesto in the world in a small shop on a hill in the town of Porto Venere on the west coast of Italy just an hours drive from Pisa, it has been his mission to recreate that garlicy basily gift from the Italian Gods. He has used every type of olive oil and parmesan imaginable and each time he makes it I hear about how amazing it was and how I should move home to be able to experience it more often (I wish!!). Anyways, sauces will be saved for another post (or two) but that is just to give you an idea about how much my family loves homemade sauces. I will say as a disclaimer, we make them simply. They aren't always started with the classic Mirepoix (celery, carrots, onions) but they do include many of the basics. This particular sauce is great because it is incredibly simple and extremely hearty.


Turkey Bolognese:


What you need:

  • 1 large yellow onion
  • A few cloves of garlic
  • 1 pound ground turkey (or go right for the ground beef if you're in that mood!)
  • 28oz can of crushed tomatoes (get San Marzano tomatoes if you can, they are the BEST canned tomatoes.. more expensive but you can absolutely taste the difference. Also, feel free to use diced tomatoes if you have them or even whole peeled stewed tomatoes and give them a rough chop yourself)
  • Red wine 
  • Tomato paste (optional)
  • Salt, pepper, dried oregano, dried basil, bay leaves (if you have thyme instead or you're missing one of the dried herbs no biggie)

What you do:

Give the onion a good chop, and throw it in a deep sauce pan with a liberal pour of olive oil on medium/high heat. Let the onions start to sweat and use a garlic press on 2-3 cloves, then add them to the onions along with a small palm full of the basil and oregano (as I've suggested before it's good to crush the herbs between your palms before tossing them in). Add salt and pepper to taste. Let the garlic/onion mix sauté for a few minutes until they are starting to look slightly golden. Add  a bit more olive oil and mix in your ground turkey. Use a spatula to continually crush the turkey while it browns, mixing it with the onions and garlic. Once the turkey is cooked through add a spoonful of the tomato paste and a dash of the red wine (I would like to give you an exact amount but I'm more the type to give a little pour and eyeball it), so don't flood the pan but pour enough to get a bit of flavor in there. Give it a good stir and let it cook for a minute or so, then pour in the entire 28oz can of crushed tomatoes. Add another palmful of the dried crushed herbs and 2 bay leaves. Give it a good stir and turn it down to low heat, at a slight simmer. If you have the time let it sit for a couple of hours uncovered. If not, try to give it at least 30 minutes to absorb the flavors. This will give you plenty of time to prep and cook your pasta and veggies! Taste test every once in a while and add more seasoning or red wine to as desired.

sauteed onions & garlic

ground turkey added

ground turkey browned

san marzano tomatos & herbs
simmering away
The Pasta:
Spaghetti is the typical pasta you might serve with a meaty sauce like this, or perhaps a flatter noodle like a pappardelle. My mom used to actually use spaghetti squash growing up in place of real pasta to cut down on carbs. It's quite Dahlicious and adds a nice crunch. Tonight however I am doing a sort of half & half. I'll be cooking a smaller than usual quantity of whole wheat spaghetti and will be mixing in some quickly steamed shaved broccoli and carrots (I bought a bag of the shaved veggie mix at TJ's this week - I think it was intended for a broccoli cole slaw of sorts but I'm using the long skinny spaghetti shaped veggies as a substitute for their carbier counterpart). 

The Greens:
Tonight's pasta will be served with simply sauteed asparagus and a butter lettuce salad with baby heirloom tomatoes and fresh mozzarella... and perhaps a few pieces of fresh basil atop the entire meal!


steamed shaved veggies & whole wheat pasta

almost done


finished product sans the side salad


I hope that yall enjoy this post and that this may serve as inspiration to:

1) Look for san marzano's - I promise you won't be disappointed
2) Recreate classic dishes by substituting more healthful ingredients (ie ground turkey and shaved veggies)
3) Put some love into a homemade sauce even though it could easily be bought in a jar, because it wouldn't have the same effect on your family and friends and most importantly on your confidence as a cook!

Enjoy!!


Tuesday, June 12, 2012

Agave Mustard Salmon

Agave Mustard Salmon.. With a weekend full of eating out behind me and a weekend full of it approaching I am trying my best to make two healthy home cooked meals this week. After venturing out on my usual Sunday TJ's run a day late yesterday, I decided that tonights healthy dinner would revolve around salmon, fresh veggies, and my favorite protein packed grain - quinoa.


On the Menu:
Agave Mustard baked Salmon, sauteed spinach with garlic, TJ's quinoa, and a tomato/mozzarella, basil side salad.


The Salmon:
I had originally planned on doing a simple lemon and pepper marinade on the salmon, but a suggestion of dusting the top with grainy mustard and popping it in the oven sparked an idea. I grabbed a mixing bowl and poured in a drizzle of olive oil, a squeeze of organic blue agave (sub honey or brown sugar), and a big spoonful of brown grainy mustard. Give it a whisk and pour it over top of the salmon (you should either have put the salmon in a pyrex baking dish or on a cookie sheet covered with aluminum foil). Then give a sprinkle of salt and pepper. Pop it in the oven at 450 degrees for about 10 minutes until it is crispy around the edges and slightly bubbling.


The Spinach:
Simple simple simple. Drizzle olive oil in a sauté pan on medium heat, then add a bag of spinach, and one large garlic clove through the garlic press. Let the greens wilt for just a minute or two before serving.


The Quinoa:
Simple again! I get quinoa at TJ's from the freezer section right by that PERFECT brown rice. Anyways the quinoa is Dahlicious, it has little hunks of zucchini and squash, and perhaps some other veggies as well. It has definitely been seasoned which I like because the few times that I've tried making quinoa myself it tastes quite bland (something I am on a mission to figure out so please let me know of any good secrets for cooking tasty quinoa at home!). This version takes just 3 minutes to heat and there you've got a perfect solution to satisfying that desire for a carb but with more protein than you'd get out of a regular side of pasta.


Mini Caprese:
There are tons of ways to create this classic, but for my dinner I simply grabbed a handful of baby heirloom tomatoes I had on hand and gave them a quick chop. Then I opened a container of small fresh mozzarella balls I also picked up yesterday and cut them in similar sized pieces. Pluck a few fresh basil leaves and give them a quick slicing and toss the combo in a bit of olive oil. Done! 


This meal is so well balanced yet flavorful - from the sweet and tangy mustard agave marinade, to the garlicy spinach, the punch of the spice blend in the quinoa, and the fresh aroma from the basil tossed with the tomatoes and mozz. I must say it was Dahlicious down the very last bite!